Aaron

Graphic Design Portfolio

Nothing found for Exams C_TS462_2023 Torrent 💑 C_TS462_2023 Reliable Learning Materials 😎 C_TS462_2023 Pass Guide đŸŒ” Easily obtain 【 C_TS462_2023 】 for free download through ▷ www.pdfvce.com ◁ ↔Certification C_TS462_2023 Training

Sorry, but nothing matched your search terms. Please try again with some different keywords.

Oh, I wish I were an Oscar Mayer … Web Dev

Do you remember that old jingle?

Oh, I wish I were an Oscar Mayer Wiener.
That is what I’d truly like to be.
For, if I were an Oscar Mayer Wiener,
everyone would be in love with me!

(Here’s the original 1965 jingle as well)

No, this post is not about bologna. It’s not about sausages, bacon, or any other pork products either. But it IS (or might be) about Oscar Mayer.

Why Oscar Mayer?

Oscar Mayer is a part of the largest food company in the US (it merged with Kraft Foods in 1989) and has a very long history (134 years). It is known for its hot dogs (wieners), its famous TV and radio jingles (here’s the story behind the original), and its Wienermobile.

But no, this post isn’t about any of that either. It’s about “web dev” – website design and development. Then, what do I mean by “I wish I were an Oscar Mayer … web dev”?

Simple: 

Have you seen the Oscar Mayer website? It’s good. It’s modern and responsive (fits to every browser size). It’s clean, well-organized, and well-branded with the company colors and imagery. But how did it get that way?

  1. Either Kraft Foods has its own in-house design and development team that put the site together
  2. OR, they hired an outside contractor (company or individual) to do the work

I’m assuming the second case scenario (contracting) is the most likely, and it’s also the one I’m shooting for as the next step in my career.

Why contract web dev work?

I’ve been building websites and doing graphic design work since 2009. During that time, I’ve acquired my Master’s Degree in Media Design, branded numerous events, built custom sites, themes, and plugins for WordPress, and helped a number of local start-ups and schools with their own websites and advertising designs.

I’ve worked with Joomla!, Moodle, WordPress, the WP REST API, HTML/CSS, Sass, PHP & MySQL, JavaScript & jQuery, React.js, Node.js, D3.js, Gulp, and Grunt. But through all this a few things have become clear. If I continue looking for freelance jobs as I have, I’ll continue reaping the same results that I have:

  1. The (local) client pool is small and the work is limited
  2. The pay is not on par with the work I do
  3. It’s hasn’t been easy to find remote work in the US (or abroad) while I live in Korea
  4. I need to accelerate my “real-world web dev experience acquisition”

TopTal.com

So, this is where TopTal.com comes in to play. From their website:

Toptal is an exclusive network of the top freelance software developers, designers, and finance experts in the world. Top companies rely on Toptal freelancers for their most important projects.

It looks a bit like Upwork.com or many of those other freelancer websites, but one of the key things that separates TopTal from the others is their rigorous up-front screening process that only allows in the “top 3%” of applicants.

Although I’d previously enjoyed some of TopTal’s in-depth articles on their Engineering Blog, I first seriously considered TopTal.com as an employment opportunity after hearing about it through the WP Developer’s Club Slack channel. One of the members, whom I’d interacted with occasionally through various Social Media channels was also living in Korea – in Seoul. He strongly encouraged me to give TopTal a look and apply, saying that he was enjoying “full-time contract (non-ESL) work” in Seoul. And the kicker: it was long-term work – 6-12 months on his contract.

My Vision for the Future

Since 2008 when I picked up my first HTML/CSS book and dove head-first into web development, I had one primary motivation driving me.

Make the web a better place.

It may sound a bit cliche, but at the time, South Korea’s Internet sites were absolutely horrible compared to what was happening back home in the US. Years ago, a law had been passed that required nearly all South Korean banking, shopping, education, and other websites to use ActiveX, install various “secure” and keyblocking scripts, and be compatible with Internet Explorer 6. (It’s only recently been removed.)

Korea’s Internet has improved dramatically since that time, but there are numerous government and business websites that still suffer from an overuse of Flash and ActiveX, so my vision hasn’t changed – and with the recent, rapid changes and progression in web technology, it’s only deepened.

I look forward to helping to create and build the web presence of big and small companies alike that many people can enjoy. So, I’m currently applying to join the TopTal Web Group and hoping to be added as a contractor to their site.

Who knows? Maybe I’ll get to work with one of their many clients: AirBnB, udemy, The Onion newspaper, or maybe even … Oscar Mayer?

For, if I were an Oscar Mayer Wiener a TopTal Web Dev,
everyone would be in love with me!

Coding an Advent Calendar: Day 16

This year, I decided to create an Advent Calendar website in HTML5, CSS3, and JavaScript. My hopes for the site are to showcase some of my frontend development abilities as well as make something fun, functional, and reusable.

Day 16

Disclaimer: I’ve been incredibly busy as of late with the following items and so haven’t had nearly as much time to work on this Advent Calendar as I’d have liked to.

  1. Giving final tests at my university (8) – I teach ESL
  2. Giving final tests at my high school (3) – I teach Graphic Design + Computer Science
  3. Wrapping up year-end grading (and “reporting”) for 2 schools
  4. Custom plugin development for a client in China
  5. Custom theme development + website building for a client in Korea (due Tuesday morning)

I’d hoped to continue making 3 adjustments per day, but it just wasn’t possible yesterday. Still, if I can at least add 1 thing per day, I can keep up some momentum and see this project completed by Christmas.

Add Argyle CSS background pattern
A while back, I stumbled upon a very interesting Christmas background design on some company’s old 2014 website (I searched my browser history this morning for about an hour to try to find that site and grab a screenshot, but for the life of me, I couldn’t). What I remember most clearly about it was that the background had a very interesting pattern: Argyle (it also took me a while to remember the name of it).

Anyway, I thought it would be a cool addition to the background for my Posts, especially if it was created entirely in CSS. So, thanks to the help of CSS3 Patterns Gallery, I was able to find something great and modify it for my needs:

#posts {
  background-color: rgba(42,111,176,0.8);
  background-image:
    repeating-linear-gradient(120deg, rgba(255,255,255,.1), rgba(255,255,255,.1) 2px, transparent 2px, transparent 120px),
    repeating-linear-gradient(60deg, rgba(255,255,255,.1), rgba(255,255,255,.1) 2px, transparent 2px, transparent 120px),
    linear-gradient(60deg, rgba(0,0,0,.1) 25%, transparent 25%, transparent 75%, rgba(0,0,0,.1) 75%, rgba(0,0,0,.1)),
    linear-gradient(120deg, rgba(0,0,0,.1) 25%, transparent 25%, transparent 75%, rgba(0,0,0,.1) 75%, rgba(0,0,0,.1));
  background-size: 138px 240px;
}

The result is what you see in the screenshot above!


Work Completed (to date)

  • December 16, 2016
    • Add Argyle CSS background pattern to Post background
  • December 15, 2016
    • Begin creating JSON file for additional Advent data
    • Attempt external load of JSON data
    • Work on style for additional Advent data
  • December 14, 2016
    • More individual styling of REST Posts
    • Break apart the project into Component pieces & create a Codepen Collection
    • Convert all the old HTML into real React Components
  • December 13, 2016
    • Add JS handlers for “Today”
    • Better styling of REST Posts
    • Begin Building a Web Interface with React.js (Lynda.com)
  • December 12, 2016
    • Storybook on Windows (FAIL)
    • Continue styling <Tag> Components
    • Begin responsive styles
  • December 11, 2016
    • Begin separating out CSS per Component
    • Attempt to load in static files & Sass
    • Begin coding a Tag for the Gifts
  • December 10, 2016
    • Finish Lynda.com videos
    • Get all React Components working in Storybook
    • Begin creating a Christmas Scene
  • December 9, 2016
    • Learn and use Create-React-App
    • Learn and use Storybook for developing React Components in isolation
    • Update npm and node and figure out my git process between Windows and Mac
  • December 8, 2016
    • Use React and Babel via CDN to get it working “locally”
    • Install React developer Tools for Chrome
    • Create very basic React.js pages to learn it
  • December 7, 2016
    • Pull post data with the WP REST API in WordPress core!!
    • Write structural code for the React Component to be rendered
    • Install and setup BabelJS to compile the React code
  • December 6, 2016
    • Add README.md
    • Add a GitHub Issue to hold usable images
    • Add LICENSE
  • December 5, 2016
    • Create a GitHub repository and full site files for easier management
    • Setup Grunt.js to compile my Sass into CSS
    • Begin blogging about the process
  • December 4, 2016
    • Countdown clock (JS Date class & jQuery Easing) with SVGs
    • Dynamic text output for Year based on the current date
    • CSS only slider (off by 5px each slide)
  • December 3, 2016
    • CSS bow & ribbon
    • Footer with FontAwesome presents
    • Hover, active, and “Christmas Day” styles for footer presents
  • December 2, 2016
    • React.js + Axios.js initial code structure
    • Color palette
    • CSS → Sass
  • December 1, 2016
    • Let it snow
    • Typography choices
    • CSS presents (first design)
    • Design notes menu

Coding an Advent Calendar: Day 15

This year, I decided to create an Advent Calendar website in HTML5, CSS3, and JavaScript. My hopes for the site are to showcase some of my frontend development abilities as well as make something fun, functional, and reusable.

Day 15

Begin creating JSON file for additional Advent data
As I continued watching Build a Web Interface with React.js, I decided to start trying to gradually implement each step of the process into my Advent Calendar Interface. The next step today was to create some JSON objects from which to load data (this is, after all, essentially what the WordPress REST API is doing anyway – now I’m just approaching this from a more foundational level to learn how this works at its most basic level).

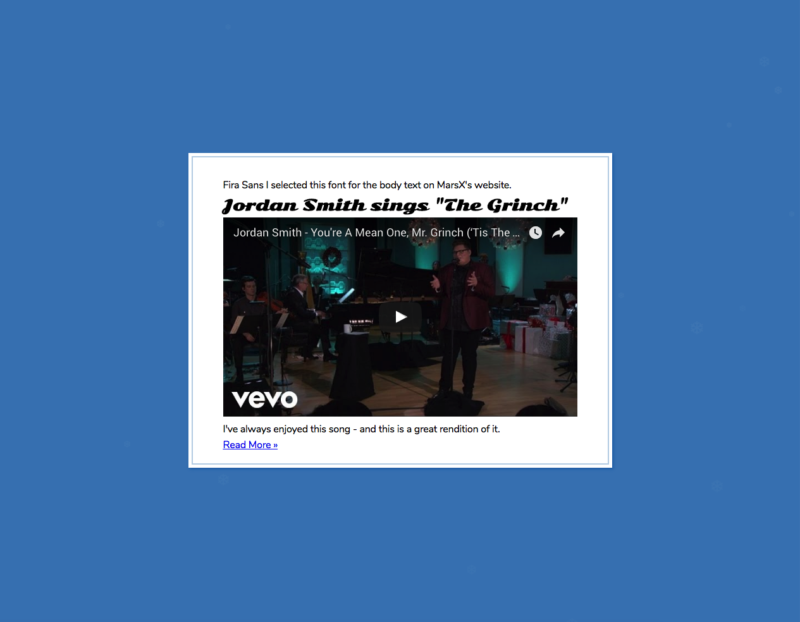
Since I’d previously mentioned wanting to share my favorite Typography in this Advent Calendar (and I’ve also always enjoyed sharing Christmas music), I decided to create two JSON key-object pairs in each member of the JSON array (which I later expanded to three to include the specific WordPress Post ID for that day’s date). These are to be used to store various data related to each day for the Calendar:

{
  "wpPostId": "31190",
  "font": {
    "typeface": "Sonsie One",
    "googleFont": true,
    "url": "",
    "fontMsg": "Selected for the large, stylized numerals."
  },
  "video": {
    "provider": "youtube",
    "videoId": "l5Y0lVM-44k",
    "videoTitle": "Jordan Smith sings \"The Grinch\"",
    "videoMsg": "I've always enjoyed this song - and this is a great rendition of it."
  }
},

I figured I didn’t need to write entirely new WordPress blog posts for each bit of “Christmas cheer” I wanted to share (posts, fonts, and videos), but adding a short message would still be useful. Therefore, I added a key for the messages in each.

Attempt external load of JSON data
Ray builds his Web Interface in a localhost environment using Webpack, but I was building this one on a new Codepen. So, even though I attempted to load an external JSON file that included all my data like he did, it didn’t quite work out as expected.

Later, I re-built the page in React Storybook and found some of my problems:

  1. I had a few typos in my JSON file – including mismatched curly brackets
  2. I was attempting to pass the file as an Object of JSON Objects, rather than an Array of JSON Objects. I realized Objects without an identifying “key” value must be stored in an Array – if I want to store it in an Object, then I’d need to identify it with a “key” value of some kind: like
    { "advent": { "day1": { ... }, "day2": { ... } } }, etc.
  3. Additionally, I tried to add comments // comment in there, which doesn’t work
  4. And, I used single quotes in certain places rather than double quotes everywhere with backslash escaped double quotes for speech, for example

Initially, I tried to load the RAW version of a Gist I wrote for this JSON file on GitHub. But due to my errors, it obviously didn’t work. And Codepen – even the Developer Tools and console didn’t provide helpful enough messages to get this sorted. However, after putting it together in React Storybook, I think I got my JSON file mostly fixed, so it’ll be worth another try.

Work on style for additional Advent data
Finally, even though I couldn’t completely get the new React Component and external JSON file working properly together, I decided I could at least add some styling to the “proposed” elements. This is what the Featured Image for this Post shows – I used the same kind of styling for this Advent data that I’ve done for my WordPress blog Posts.

The following are some ideas for further development of this feature:

  • Create a CSS stocking that holds a “package” with the name of the font I’ve chosen. When hovered over, CSS animation pulls it from the stocking so it can be clicked to “open”. When opened, it displays the message.
  • Allow non-YouTube video IDs (Vimeo) and non-Google Fonts font URLS (Font Awesome, etc).
  • Include WordPress Post IDs for each date
  • Add a radio button Component that allows switching between loading WordPress blog Posts or the “Christmas content” (typography and videos)
  • Add a feature to display the entire Christmas playlist somewhere (using only my JSON data – and not an actual YouTube playlist)
  • Get each font to load on its own package and message

And just for fun, here’s the Christmas song I’ve chosen for today:

https://www.youtube.com/watch?v=l5Y0lVM-44k


Work Completed (to date)

  • December 15, 2016
    • Begin creating JSON file for additional Advent data
    • Attempt external load of JSON data
    • Work on style for additional Advent data
  • December 14, 2016
    • More individual styling of REST Posts
    • Break apart the project into Component pieces & create a Codepen Collection
    • Convert all the old HTML into real React Components
  • December 13, 2016
    • Add JS handlers for “Today”
    • Better styling of REST Posts
    • Begin Building a Web Interface with React.js (Lynda.com)
  • December 12, 2016
    • Storybook on Windows (FAIL)
    • Continue styling <Tag> Components
    • Begin responsive styles
  • December 11, 2016
    • Begin separating out CSS per Component
    • Attempt to load in static files & Sass
    • Begin coding a Tag for the Gifts
  • December 10, 2016
    • Finish Lynda.com videos
    • Get all React Components working in Storybook
    • Begin creating a Christmas Scene
  • December 9, 2016
    • Learn and use Create-React-App
    • Learn and use Storybook for developing React Components in isolation
    • Update npm and node and figure out my git process between Windows and Mac
  • December 8, 2016
    • Use React and Babel via CDN to get it working “locally”
    • Install React developer Tools for Chrome
    • Create very basic React.js pages to learn it
  • December 7, 2016
    • Pull post data with the WP REST API in WordPress core!!
    • Write structural code for the React Component to be rendered
    • Install and setup BabelJS to compile the React code
  • December 6, 2016
    • Add README.md
    • Add a GitHub Issue to hold usable images
    • Add LICENSE
  • December 5, 2016
    • Create a GitHub repository and full site files for easier management
    • Setup Grunt.js to compile my Sass into CSS
    • Begin blogging about the process
  • December 4, 2016
    • Countdown clock (JS Date class & jQuery Easing) with SVGs
    • Dynamic text output for Year based on the current date
    • CSS only slider (off by 5px each slide)
  • December 3, 2016
    • CSS bow & ribbon
    • Footer with FontAwesome presents
    • Hover, active, and “Christmas Day” styles for footer presents
  • December 2, 2016
    • React.js + Axios.js initial code structure
    • Color palette
    • CSS → Sass
  • December 1, 2016
    • Let it snow
    • Typography choices
    • CSS presents (first design)
    • Design notes menu

Coding an Advent Calendar: Day 14

This year, I decided to create an Advent Calendar website in HTML5, CSS3, and JavaScript. My hopes for the site are to showcase some of my frontend development abilities as well as make something fun, functional, and reusable.

Day 14

Individual Post Styles
As I mentioned yesterday, I wanted to only show one WordPress post at a time when any package is clicked on. So, that’s what I set about doing today (as the Featured Image above shows). There are a few things I still need to take care of however:

  1. IF the Gift clicked on doe NOT (yet) have a Post for that date, show some kind of “Coming Soon” message.
  2. The Posts need to either be in a Carousel that mirrors the Gift carousel, OR they need to be dynamically loaded by the WP REST API and React based on the ID number (date) of the Gift clicked on.
  3. The “prev” and “next” buttons need some style corrections (like text-alignment and z-index to place them OVER the Post border) as well as functionality.
  4. Ideally, if a user clicks “prev” or “next”, the Post background (dark blue) would remain unchanged, and only the Posts would slide left or right (as a carousel).
Codepen Collection
I was still having trouble with my Gift carousel being off by a few pixels each time the carousel rotated, and then I tried to make the Gifts scale when hovered over:

Oops. What happened?

Well, I decided that since I started having THIS problem with scaling the Gifts AND I was already having trouble with getting the carousel to display and function properly, I probably had an error in my code somewhere that I was overlooking. Therefore, I decided to start breaking apart all the various pieces and components of this project to take a closer look at each of them individually.

It turns out the scale problem was happening because I didn’t have some kind of <div class="gift-wrapper"> surrounding my Gifts. So scale was scaling the CSS image from the center of itself (and thus pushing it out of the center of the page), rather than from the center of the wrapper which would allow it to remain centered in the page. Here’s what it looks like now with a <div class="gift-wrapper">:

In addition to the Gift Component, I also extracted out the Countdown Clock, and the individual Blog Post Component into separate Codepens and added them to a Collection:

  1. Gift Component
  2. Countdown Clock Component
  3. Post Component

From here, it allows me to continue working on the individual Components for the site even from my Windows computer. And once these pieces are perfected, I can then compile them all back together again as a “real” website.

React-ify All the Things!

So, since I’ve now separated out all the Components of the project, I decided it would be a great time to convert my existing HTML into true React Components. Now, the only HTML I have sitting in the Codepens above are:

<div id="react-component-name"></div>

All the markup is now handled entirely by React. And now, I feel like I’m ready to continue with Ray Villalobos’ Course: Building a Web Interface with React.js to learn better how I can get these various Component pieces to interact with each other better.

Side note: One additional thing I learned while working with these React Components is that: in order for jQuery (or any other JavaScript) to work and interact with these Components, React must be allowed to BUILD the Components on the page FIRST – before any other JavaScript functions are declared. Otherwise, jQuery will attempt to bind a "click" function (for example) on a tag that has not yet been created.


Work Completed (to date)

  • December 14, 2016
    • More individual styling of REST Posts
    • Break apart the project into Component pieces & create a Codepen Collection
    • Convert all the old HTML into real React Components
  • December 13, 2016
    • Add JS handlers for “Today”
    • Better styling of REST Posts
    • Begin Building a Web Interface with React.js (Lynda.com)
  • December 12, 2016
    • Storybook on Windows (FAIL)
    • Continue styling <Tag> Components
    • Begin responsive styles
  • December 11, 2016
    • Begin separating out CSS per Component
    • Attempt to load in static files & Sass
    • Begin coding a Tag for the Gifts
  • December 10, 2016
    • Finish Lynda.com videos
    • Get all React Components working in Storybook
    • Begin creating a Christmas Scene
  • December 9, 2016
    • Learn and use Create-React-App
    • Learn and use Storybook for developing React Components in isolation
    • Update npm and node and figure out my git process between Windows and Mac
  • December 8, 2016
    • Use React and Babel via CDN to get it working “locally”
    • Install React developer Tools for Chrome
    • Create very basic React.js pages to learn it
  • December 7, 2016
    • Pull post data with the WP REST API in WordPress core!!
    • Write structural code for the React Component to be rendered
    • Install and setup BabelJS to compile the React code
  • December 6, 2016
    • Add README.md
    • Add a GitHub Issue to hold usable images
    • Add LICENSE
  • December 5, 2016
    • Create a GitHub repository and full site files for easier management
    • Setup Grunt.js to compile my Sass into CSS
    • Begin blogging about the process
  • December 4, 2016
    • Countdown clock (JS Date class & jQuery Easing) with SVGs
    • Dynamic text output for Year based on the current date
    • CSS only slider (off by 5px each slide)
  • December 3, 2016
    • CSS bow & ribbon
    • Footer with FontAwesome presents
    • Hover, active, and “Christmas Day” styles for footer presents
  • December 2, 2016
    • React.js + Axios.js initial code structure
    • Color palette
    • CSS → Sass
  • December 1, 2016
    • Let it snow
    • Typography choices
    • CSS presents (first design)
    • Design notes menu

Coding an Advent Calendar: Day 13

This year, I decided to create an Advent Calendar website in HTML5, CSS3, and JavaScript. My hopes for the site are to showcase some of my frontend development abilities as well as make something fun, functional, and reusable.

Day 13

Add JS handlers for “Today”
“Today” I didn’t have tons of time to put in to work on this project. So, I chose some of the “low hanging fruit” to work on – to make meaningful progress with small(er) modifications.

One of these “low hanging fruit” was adding JavaScript handlers for properly displaying the proper packages based on the current date. Here’s the procedure:

  1. Use .getDate() from the JavaScript Date object to get the numeric date for today
  2. Use jQuery selectors to grab the page elements that need manipulated accordingly
  3. Use conditionals to determine which classes or CSS to apply to each (particularly the Font Awesome gifts in the footer – as each can have 3 “states”)
    1. "active" = green/red package
    2. "today" = highlighted (darker) and scaled (larger)
    3. "disabled" = grayed out
  4. Also, use jQuery .unbind('click') on any "disabled" footer packages to prevent clicking (and peeking at presents before the time has come)
Better styling of REST Posts
Another of the “low hanging fruits” I decided to tackle today was the styling of the WordPress Posts called in with the REST API. This is particularly important for the responsiveness of this design as leaving the Posts underneath the large Gift box on smaller screens would crowd the screen.

I decided to make the WordPress Posts pop up on an “overlay” or “lightbox” style screen (as the Featured Image above shows) when the Gift is clicked on. Here are the steps I took to do this as well as thoughts for its further development:

  1. Make the React Component #posts container act as the overlay (with dark blue background)
  2. Add an extra <div className="inner"> in React to surround each Post’s content
  3. Query the WP REST API for 25 Posts (with per_page=25)
  4. Make the #posts container pushed off the page 100% to the bottom so that when the Gift is clicked, I apply a CSS animation to ease-in the top-margin back to 0 (which makes the #posts container slide in from the bottom
  5. Make the entire dark blue background of the #posts container clickable – to rehide the container at the bottom of the page (slide down)

Notes for future development:

Although I’d originally considered just having React dynamically “react” to clicks on various boxes to display ONLY the Post from that date, I’m now considering styling #posts in the same way as the Gift boxes #carousel:

  1. allow each Gift to take up the full width and height of the visible page area
  2. allow each Post to take up the full width and height of the invisible page area to the bottom of the screen

This would easily line up both the Gift box and the Post for its date one on top of the other, so that when the Gift box is clicked and the #posts container animates upward, ONLY the Post for that date would be visible. This would also give me a little more freedom about how to style each Post individually.

One more consideration I’d made is how I might use React to ONLY (dynamically) load 3 Posts at once:

  1. The currently selected Post (defaults to "today")
  2. The previous Post and dated Gift
  3. The next Post and dated Gift

This would allow both the Gift #carousel and the #posts containers to reduce their maximum necessary width to only 3 screen-lengths (instead of 25 screen-lengths) and therefore also probably reduce the “bugginess” that’s currently affecting my Carousel (about 5px extra left margin on EVERY subsequent date for some reason – which adds up to a HUGE space by the time Christmas comes).

But, I haven’t yet worked out how to do that with my limited knowledge of React.js and Components – and that’s what led me to the third step for today ↓

Begin Ray Villalobos React Course
I decided to head back over to Lynda.com to try to learn some more about React. There aren’t actually that many React courses on Lynda.com YET, but the one that looked most helpful for the kinds of ways I’m considering using React in this project was Ray Villalobos’ React Course:

Building a Web Interface with React.js

I’m looking forward to learning much more through this Course that I can put into practice in my Advent Calendar. PLUS, as I am able to use create-react-app on my Windows PC but not getstorybook, it will allow me to continue (branched) development both at work (Windows) and at home (Mac).


Work Completed (to date)

  • December 13, 2016
    • Add JS handlers for “Today”
    • Better styling of REST Posts
    • Begin Building a Web Interface with React.js (Lynda.com)
  • December 12, 2016
    • Storybook on Windows (FAIL)
    • Continue styling <Tag> Components
    • Begin responsive styles
  • December 11, 2016
    • Begin separating out CSS per Component
    • Attempt to load in static files & Sass
    • Begin coding a Tag for the Gifts
  • December 10, 2016
    • Finish Lynda.com videos
    • Get all React Components working in Storybook
    • Begin creating a Christmas Scene
  • December 9, 2016
    • Learn and use Create-React-App
    • Learn and use Storybook for developing React Components in isolation
    • Update npm and node and figure out my git process between Windows and Mac
  • December 8, 2016
    • Use React and Babel via CDN to get it working “locally”
    • Install React developer Tools for Chrome
    • Create very basic React.js pages to learn it
  • December 7, 2016
    • Pull post data with the WP REST API in WordPress core!!
    • Write structural code for the React Component to be rendered
    • Install and setup BabelJS to compile the React code
  • December 6, 2016
    • Add README.md
    • Add a GitHub Issue to hold usable images
    • Add LICENSE
  • December 5, 2016
    • Create a GitHub repository and full site files for easier management
    • Setup Grunt.js to compile my Sass into CSS
    • Begin blogging about the process
  • December 4, 2016
    • Countdown clock (JS Date class & jQuery Easing) with SVGs
    • Dynamic text output for Year based on the current date
    • CSS only slider (off by 5px each slide)
  • December 3, 2016
    • CSS bow & ribbon
    • Footer with FontAwesome presents
    • Hover, active, and “Christmas Day” styles for footer presents
  • December 2, 2016
    • React.js + Axios.js initial code structure
    • Color palette
    • CSS → Sass
  • December 1, 2016
    • Let it snow
    • Typography choices
    • CSS presents (first design)
    • Design notes menu